In this article, I teach you computer typing lessons. Today we learn about Microsoft Office Powerpoint.
It is important to know all the features of Microsoft Powerpoint. In this article, I will explain about complete features of Microsoft Powerpoint.
There are 9 Menus in Microsoft Excel which are as follows:
- File
- Home
- Insert
- Design
- Transitions
- Animations
- Slide Show
- Review
- View
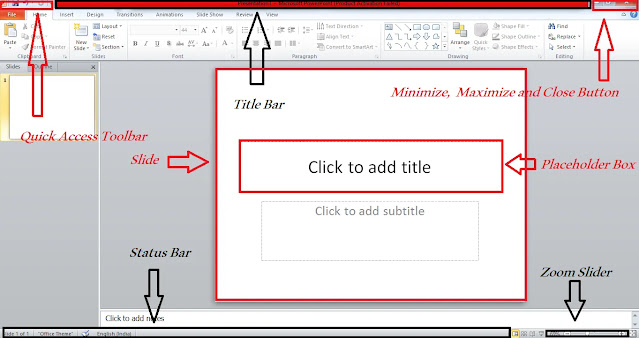
First of all, understand all bars in the Microsoft Office Powerpoint window.
File Menu:
The options present in this menu are saved, save as, open, close, info, Recent, New, Print, Save and send, help, Options and Exit. If you want to save the file then use the save option. If you want to save the file with a different name then use save as an option. If you want to open an already saved Powerpoint file then use an open option.
If you want to close the presentation then use a close option. The info option will give information about the currently open presentation. The recent option shows recently open files. If you want to create a new presentation then use the New option. If you want to print a presentation then use the Print option. If you want to save and send a presentation then use Save and Send Option. Help option displays help dialog box. Options command shows different settings which are useful using Powerpoint. If you want to Exit the Powerpoint application then use the Exit option.
If you want to close the presentation then use a close option. The info option will give information about the currently open presentation. The recent option shows recently open files. If you want to create a new presentation then use the New option. If you want to print a presentation then use the Print option. If you want to save and send a presentation then use Save and Send Option. Help option displays help dialog box. Options command shows different settings which are useful using Powerpoint. If you want to Exit the Powerpoint application then use the Exit option.
Home Tab:
The groups available in Home tabs are Clipboard, Slides, Fonts, Paragraph, Drawing, and Editing.
The clipboard group contains cut, copy, paste, and format painter options. If you want to cut data then use the cut option. If you want to copy the data then use the copy option. If you want to paste copied option then use the paste option. If you want to copy the formatting and paste it to another data then use the format painter option.
The Slides group contains a New Slide, Layout, Reset, and Section options. The new slide is used to create a new slide. You can change the layout of the selected slide with the Layout option. You can reset all the settings with the Reset option. Organize your slides with Section options.
The Font group contains Font, Font size, Increase font size, Decrease font size, Bold, Italic, Underline, Text shadow, Strikethrough, Character spacing, Change case, Clear all Formatting and Font color. I already explained the function of each option in the Microsoft Word article except the Text shadow option. You can add a shadow behind the selected text with the text-shadow option.
The Paragraph group contains Bullets, Numbering, Decrease List level, Increase List level, Left alignment, Middle alignment, Right alignment, Justify alignment, Columns, Line spacing, Text Direction, Align text, Convert to SmartArt. You can give bullets and numbering with the Bullets and Numbering option. You can increase and decrease indent with the Increase List level and Decrease List level option. You can change the alignments with alignment options. You can split the text into two or more columns with the Columns option. You can adjust line spacing with the Line Spacing option. You can change the orientation of text with the Text direction option. You can change how text is aligned with the text box with Align text option. You can convert text into smartart graphics with the Convert to SmartArt option.
The Drawing group contains the Shape, Arrange, Quick styles, Shape Fill, Shape Outline and Shape Effect option. You can add different shapes with the shape option. You can arrange objects in the slides with Arrange option. You can choose the visual style with the Quick styles option. You can fill the color, outline, and effect to selected shapes with Shape Fill, Shape Outline, and Shape Effect options respectively.
The Editing group contains the Find, Replace, and Select option. You can find, replace and select text with these options.
Insert Tab:
The groups in the Insert tab are Tables, Images, Illustrations, Links, Text, Symbols, and Media.
The table group contains a table option. You can add a table with this option.
The Images group contains Picture, Clipart, Screenshot, and Photo Album options. You can add pictures, clipart, take screenshots and add photo albums with these options.
The Illustrations group contains shapes, SmartArt, and chart options. You can add shapes, SmartArt, and chart with these options.
The Links group contains hyperlinks and action commands. You can add a hyperlink and set a specific action with these options.
The text group contains a Text box, Header, and Footer, Wordart, Date and Time, Slide number, and object options. You can add text with the help of the text box option. You can add a header and footer with the help of the header and footer option. You can add WordArt with the WordArt option. You can insert the date and time with the date and time option. If you want to add slide numbers then you can use the slide number option. You can add an embed object with an object option.
The symbols group contain Equation and symbols. You can add equations and symbols with these options
The Media group contains video and audio options. You can add video and audio clips with these options.
Design Tab:
The groups in Design Tab are Page Setup, Themes, and Background.
The Page setup group contains page setup and slide orientation options. You can set up a page and Slide orientation with these options.
The Themes group contains themes, Colors, Fonts, and Effects options. You can choose a specific theme and apply different colors, fonts, and effects with these options.
The Background group contains Background styles and Hide Background Graphics. You can apply different background styles with these options. If you don't want to show background graphics then use the hide background graphics option.
Transitions Tab:
Transitions Tab:
The groups in the Transitions tab are Preview, Transition to this slide, and Timing.
The preview group contains a preview option. You can see a preview of the transitions with this option.
You can add the different transitions to the presentation with Transition to this slide group.
You can adjust the timing of transitions with the Timing group.
Animations Tab:
The groups in the Animations tab are Preview, Animation, Advanced Animation, and Timing.
You can see a preview of the animation with the Preview group.
You can see a preview of the animation with the Preview group.
You can add different animations with the Animation group.
You can get an advanced animations option with an Advanced Animation group.
You can adjust the timing of Animations with the Timing group.
Slide Show Tab:
The groups available in this tab are Start slide show, set up, and monitors.
The start slide show group contains From the beginning, From current slide, Broadcast slide show, and Custom slide show options. You can start the slide show from the beginning with From beginning option. You can start the slide show from the current slide with From current slide option. You can broadcast slide show with the Broadcast slide show option. You can create or play a custom slide show with a custom slide show option.
The Setup group contains Set up a slide show, Hide Slide, Rehearse timings, Record slide show options. You can set up an advanced option with Setting up slide show option. You can hide the current slide with the Hiding slide option. You can set the amount of time spend on each time with Rehearse timings option. You can record slide shows with the Record slide show option. You can check or uncheck Play Narrations, Use Timings and Show Media Controls options.
The monitor group contains Resolution, Show on, and Presenter Option.
You can choose the resolution to use for the full-screen slide show with the Resolution option. Choose a monitor on which to display the full-screen slide show with the Show on option. You can show the full-screen slide show with the presenter option.
Review Tab:
The groups available in this tab are Proofing, Language, Comments, Compare and One note.
Review Tab:
The groups available in this tab are Proofing, Language, Comments, Compare and One note.
The Proofing group contains spelling, research, and thesaurus option. Check the spelling of the text with the spelling option. You can make the research with a research option. The Thesaurus option suggests words with similar meanings.
The language group contains translation and language options. You can translate language with the translate option. You can change the language with the language option.
You can compare and combine another presentation with your current presentation with compare group.
You can create or open notes about this presentation with the One note option.
View Tab:
The groups in the View tab are Presentation views, Master views, Show, Zoom, Color/Greyscale, Window, and Macros.
The options in presentation views are Normal, Slide sorter, Notes page, and Reading view. You can switch to any view with these options.
The options in presentation views are Normal, Slide sorter, Notes page, and Reading view. You can switch to any view with these options.
The options in master views are Slide Master, Handout Master, and Notes Master. You can manage views with these options.
The show group contains the Ruler, Gridlines, and Guides option. You can check or uncheck any option from these options.
The zoom group contains the zoom and fits the window option. You can adjust the zoom percentage with a zoom option. You can zoom the presentation so that slides fill the window with fit to window option.
You can adjust the color options with the Color/Greyscale group.
The window group contains New window, arrange all, cascade, move split, and switch window option. Adjust the windows options with this group.
View the list of Macros with the Macros group.
I hope you understand all the basic features of Microsoft Office Powerpoint.
I hope you understand these computer typing lessons. If you like this article, share this article with your friends.


